Dental Software Tip: EasyDental Patient Payment Plan
The steps to creating a payment plan from the Collections Manager are easy:
-
- Double-click a patient’s name on the Collections Manager list. (Note: Or by clicking the Billing/Payment Plan Information button.)
- If a payment plan exists for the patient, the Billing/Payment Plan Information dialog box appears, and you can manage the patient’s account from there.
- If no payment plan exists for the patient, a message appears asking if you’d like to create one. Click Yes to set up a new payment plan and open the Billing/Payment Plan Information dialog box.

- From the Billing/Payment Plan Information dialog box, edit the payment plan date of setup in the Date field (see 3 in the image below).

- Select the payment Interval (see 4 in the image). Your options are:
- Monthly – Requires a payment once a month.
- Semi-Monthly – Requires a payment twice a month.
- Bi-Weekly – Requires a payment every two weeks.
- Weekly – Requires a payment once a week.
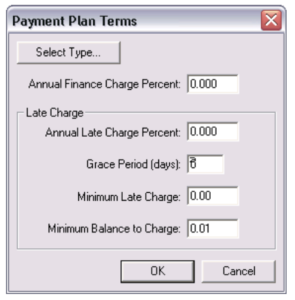
- Click the Terms button (see 5 in image) to select the finance charge and late charge settings.
- The Payment Plan Terms dialog box appears. From this dialog box, you can enter interest, or Annual Finance Charge Percent, and create a Late Charge. (Note: If you will not be setting up finance or late charges, leave the fields set to zero and click OK.)
- In the Billing/Payment Plan Information dialog box (see 6 in the image), the account balance is automatically entered as the patient’s current balance.
- Edit the Bal. for PP amount here if needed.

- Enter the date the first payment will be due in the First Pmt Due field (see 7 in the image).
- Enter the amount of each payment in the Payment Amt field (see 8 in the image).
- Easy Dental will automatically calculate the number of payments needed to fulfill the payment plan agreement based on the balance and the payment amount.
- Edit the Total # of Payments (see 9 in the image), if needed. (Note: You can also enter the number of payments, and Easy Dental will calculate the amount of each payment.)
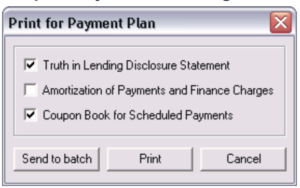
- Click Print (see 10 in image) to open the Print for Payment Plan dialog box and print any of the following:
- Truth in Lending Disclosure Statement – This is the terms of the payment plan and includes the annual percentage rate, finance charge amount, total amount financed, and total amount paid at the end of the plan.
- Amortization of Payments and Finance Charges – This is a schedule listing the interest accrued on the remaining balance for each payment interval.
- Coupon Book for Scheduled Payments – This creates payment remittance coupons for the patient.

- Click OK to save the payment plan and return to the Collections Manager.
- Double-click a patient’s name on the Collections Manager list. (Note: Or by clicking the Billing/Payment Plan Information button.)
eAssist Helpful News and Billing Tips; Edition #116


0 Comments